How to Convert DICOM to JPEG in Minutes

Fastest way to convert DICOM to JPEG or JPG
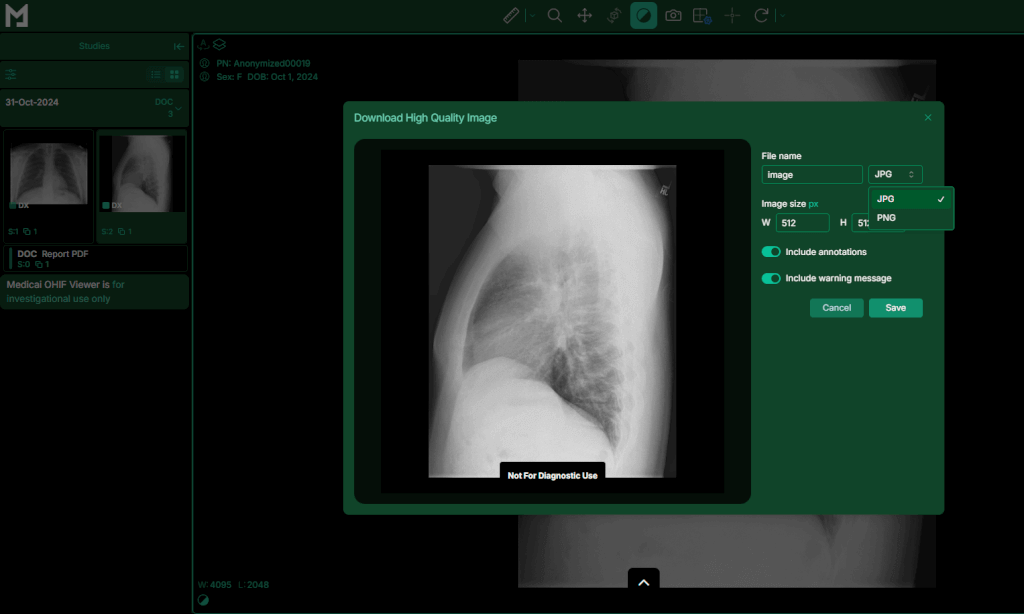
- Open the Medicai DICOM Viewer and upload the study folder.
- Select Capture, choose JPEG or JPG, and set quality.
- Export, then verify 3 images for windowing and contrast before sharing.

The DICOM to JPEG process extracts and window-levels the raw pixel data, then compresses it into a standard JPEG file. This process preserves key diagnostic details while making images instantly viewable on any device, without specialized software.
Ready to simplify your imaging workflow?
Discover the step-by-step methods, expert tips on quality, and use cases that show how effortless converting DICOM to JPEG can be.
What Is DICOM vs. JPEG?
DICOM (Digital Imaging and Communications in Medicine) is the universal standard for handling, storing, printing, and transmitting medical imaging data. Each DICOM file bundles raw pixel data with a rich metadata header, including patient identifiers, study dates, acquisition parameters, and even device settings.
This structure ensures clinical images remain linked to their context, enabling PACS viewers and diagnostic tools to display both image and patient details seamlessly.
JPEG (Joint Photographic Experts Group) is a widely used image format for photographs and graphics. It uses lossy compression to shrink file sizes by discarding subtle color variations, making it ideal for web delivery and general-purpose viewing.
Unlike DICOM, a JPEG file contains only basic EXIF metadata (camera model, timestamp). There is no clinical information, so virtually any image viewer can open it. However, it lacks the detailed context needed for medical diagnosis.
| Feature | DICOM | JPEG |
|---|---|---|
| File Extension | .dcm | .jpg or .jpeg |
| Data Encapsulation | Raw pixels plus comprehensive medical metadata | Pixel data plus basic EXIF metadata |
| Compression | Often lossless (for example JPEG 2000) or uncompressed | Lossy compression with tunable quality |
| Metadata Support | Extensive, patient, study, device, protocol | Minimal, camera info, and timestamp |
| Primary Use Cases | Clinical archives, diagnostic review, and AI training | Web display, documents, presentations |
| Viewer Requirements | DICOM-capable software or PACS | Any standard image viewer |
| File Size | Typically larger, MBs to GBs | Smaller, KBs to a few MBs |
Medicai’s imaging platform reads full DICOM headers and uses optimized windowing. It then exports high-quality JPEGs that retain important diagnostic details while providing web-ready files in a single, easy process.
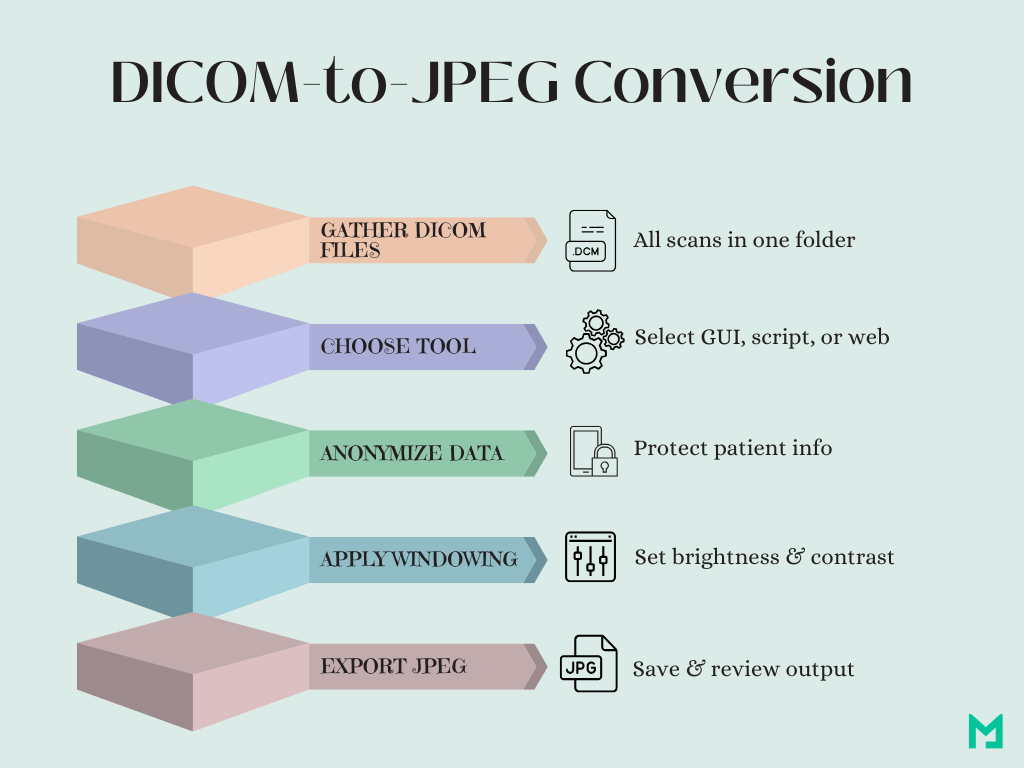
How To Convert DICOM to JPEG
Follow these clear steps to convert raw DICOM files into ready-to-use JPEG images.
Gather Your DICOM Files
Place all source .dcm files into a single folder. Consistent naming helps you track originals and outputs.
Choose Your Conversion Tool
Decide between a GUI app, Python script, CLI utility, or web service based on your comfort and batch size.
Anonymize Patient Data
Run an anonymization pass to strip names, IDs, and dates. This protects privacy before any export.
Apply Windowing or LUT
Select the appropriate window-level preset or lookup table for your anatomy (e.g., brain, lung). This enhances diagnostic detail.
Execute the Conversion
- GUI: Import the folder, pick JPEG, set quality, and click Export.
- Python: Load with pydicom, apply windowing, save via Pillow.
- CLI: Run dcmj2pnm +oj +J +on input.dcm output.jpg.
- Web: Upload files, adjust settings, and download the ZIP.
Review Sample Outputs
Open several JPEGs in different viewers to check contrast, cropping, and color fidelity. Adjust settings if needed.
Organize and Archive
Move your JPEGs into a dedicated “converted” folder. Keep a log of original-to-JPEG mappings for traceability.
Methods of Conversion
Choose the right conversion method based on your needs and technical comfort. Below are four precise approaches.
GUI Tools: Medicai DICOM Viewer
Graphical apps like Medicai DICOM Viewer let you load a DICOM series, select JPEG as the output format, and save instantly. These tools are ideal for quick, one-off conversions without writing any code.
- Open Medicai DICOM Viewer: Launch a GUI application like our DICOM viewer.
- Import the Study Folder: Use the “Upload File” menu to load the .dcm files either from a CD or your computer.
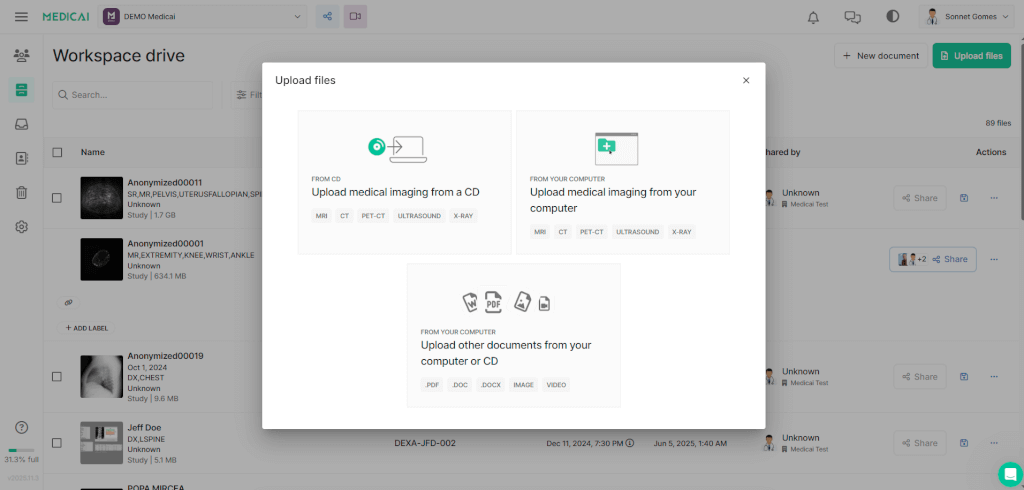
- Select Export Format: Navigate to the “Capture (Camera Icon)” dialog, choose “JPEG” as the output type.

- Export: Click “Save” then choose an output directory. The tool will convert the loaded file.
RadiAnt export, Windows
RadiAnt converts DICOM to JPEG by exporting the current image or a selected series as JPG or JPEG from the viewer export function.
- RadiAnt step 1: Open the DICOM study, then select the image or series you want to export.
- RadiAnt step 2: In the viewer, use the export option, choose JPG or JPEG as the output format, then set the quality and output folder.
- RadiAnt step 3, Export, then open 2 to 3 exported images to confirm windowing looks correct and no patient identifiers are visible on the image itself.
RadiAnt exports pixels, so any burned-in text on the image stays, and a quick visual check prevents accidental PHI sharing.
Python Libraries
Combine Pydicom with Pillow and NumPy to script your conversion. This approach scales easily for batch processing or integration into larger workflows.
- Install Libraries
- Load a DICOM File
- Apply Windowing
- Apply Windowing
- Batch Process (Loop over all .dcm files in a folder using Python’s os or glob module to automate)
Command-Line Utilities
Utilities such as DCMTK’s dcm2img or ImageMagick offer terminal-based conversion. With a single command, you can process entire directories, apply filters, and resize images—all without leaving the command line.
Web-Based Converters
Online converters help you upload DICOM files and download JPEGs from your browser. They’re convenient for quick tests, but be mindful of privacy policies and file size limits before sharing sensitive studies.
- Choose a Secure Service: Open a trusted DICOM-to-JPEG web converter with clear privacy policies.
- Upload Files: Drag and drop or select multiple .dcm files via the upload interface.
- Configure Settings: Select JPEG output, set quality level, and apply any anonymization options.
- Convert and Download: Click “Convert,” wait for processing, then download the ZIP containing your JPEGs.
- Verify and Organize: Unzip, review sample images, and move them into your target directory.

Key Considerations Before DICOM to JPEG Conversion
Several key considerations will help you create JPEG files that are secure, high-quality, and suitable for their intended use.
Privacy & Anonymization
Conversion risk starts when you convert DICOM to JPEG because JPEG sharing workflows spread quickly, and patient identifiers can persist as embedded text or filenames even after metadata removal.
Privacy checklist for DICOM to JPEG exports
- Anonymization step, strip patient name, MRN, and accession in the export workflow when the tool supports it.
- Burned-in text step, check corners and overlays for names, dates, facility names, and remove overlays before export.
- Filename step, rename outputs to a neutral scheme, study-001, image-001, not patient-name.
- Cloud upload step, treat online converters as data sharing, confirm retention policy, and delete rules before upload.
Before converting, strip or overwrite any patient identifiers embedded in DICOM headers. Removing names, IDs, and dates protects privacy and ensures compliance with HIPAA and GDPR.
Medicai’s platform offers one-click anonymization filters that automatically scrub sensitive tags while preserving essential imaging data for analysis and sharing.
Image Quality
Conversion often alters contrast, bit depth, and dynamic range. Select the appropriate bit depth (8-bit vs. 16-bit) to balance file size and diagnostic detail. Apply a consistent LUT or windowing preset to maintain visibility of key structures.
Beware of compression artifacts: setting JPEG quality above 90% usually minimizes unwanted noise without inflating file sizes.
Use-Case Alignment
Match your output to its purpose. For research and AI training, maintain high fidelity by using lossless or near-lossless settings. For teaching slides or clinical reports, a standard 8-bit JPEG at moderate quality often suffices.
Best Practices for Quality & Consistency
Before exporting your images at scale, establish clear guidelines to preserve diagnostic value and ensure uniformity across your dataset.
Choosing JPEG Quality Settings
Aim for a quality level between 85% and 95%. This range minimizes visible compression artifacts—such as blockiness or color banding—while keeping file sizes practical for storage and sharing.
Always test a few samples at different settings to verify that subtle tissue details remain crisp.
Handling Multi-Frame DICOM
When working with cine loops or volumetric scans, decide if you need individual frames, a contact sheet, or an animated sequence.
Export single frames by specifying the desired index in your tool or script. For quick previews, create a contact sheet combining selected slices into one JPEG to streamline review.
Applying Windowing/LUT for Optimal Contrast
Medical images often require a window-level adjustment to highlight structures like bone, brain, or lung.
Apply a consistent window preset or use a custom lookup table (LUT) across all conversions. This ensures that each JPEG presents comparable brightness and contrast, preventing misinterpretation during comparative review.n
Verifying Output with Image Viewers
Always spot-check your JPEGs in at least two viewers: a generic image viewer (e.g., Windows Photos, Preview) and a clinical viewer that supports JPEG. This simple step catches unexpected color shifts, cropping issues, or missing frames before distribution, safeguarding image integrity.
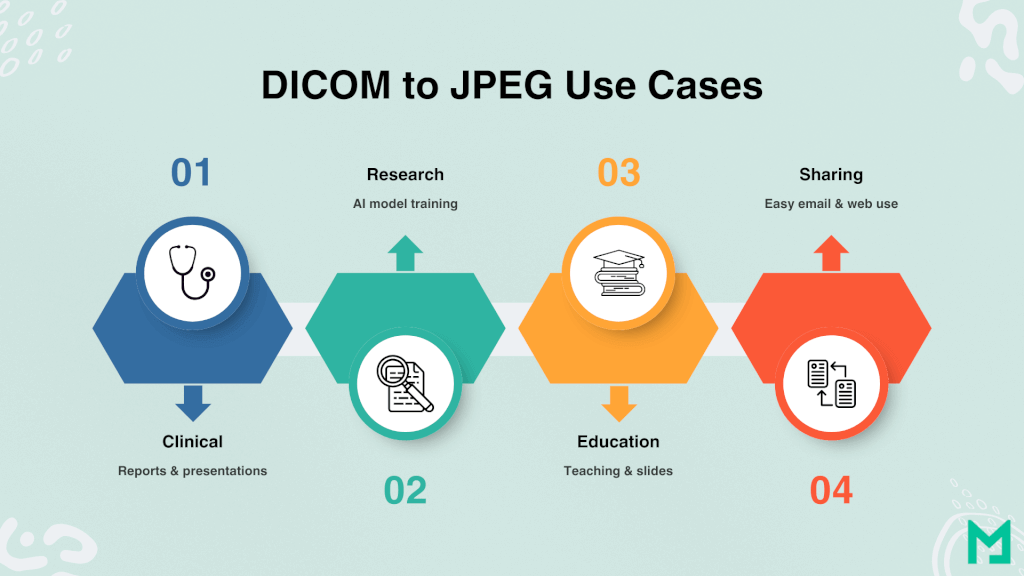
DICOM vs. JPEG: Use Cases
There are several places where converting DICOM to JPEG enhances workflows.
Clinical Presentation & Reporting
Medical teams need to share scans quickly across disciplines. Converting DICOM to JPEG helps radiologists to easily embed images into PowerPoint or PDF reports, facilitating faster discussions in tumor boards and ensuring everyone sees the same details clearly.
Research & AI Development
Researchers and AI engineers use large image datasets to train algorithms. By exporting high-quality JPEGs with consistent windowing and bit depth, they create diverse training sets that enhance the preprocessing process.
Batch conversion scripts automate this process, speeding up model development.
Education & Training
Educators use JPEG exports to create anonymized teaching materials. A set of brain and chest images, converted at 95% quality, becomes a slide deck for medical students studying anatomy or pathology.
Since JPEGs can open on any device, learners can easily access cases on tablets or phones without needing DICOM software.
Conclusion
Converting DICOM to JPEG enhances image sharing and reporting efficiency. By using the right tools and best practices—like privacy safeguards and quality settings—you can preserve diagnostic value while expanding applications.
With Medicai’s integrated conversion capabilities, you gain audit trails, anonymization, and scalable automation, transforming medical imaging into a seamless and secure process.


Related Articles


Lets get in touch!
Learn more about how Medicai can help you strengthen your practice and improve your patients’ experience. Ready to start your Journey?
Book A Free Demo