PACS Integration for Modern Veterinary Practices

Tired of chasing down images, repeating data entry, or flipping between systems just to finalize a patient report? Well, here’s a better way to handle your work: Vet PACS integration.
Vet PACS integration brings all your critical tools together: imaging, patient records, scheduling, and billing. With everything working in sync, your clinic saves time, reduces errors, and delivers faster, more coordinated care.
Let’s break down exactly how PACS integration works, the benefits it brings, and what to look for in a solution.

What Is Vet PACS Integration?
Vet PACS integration simply means connecting your imaging system (like X-rays or ultrasounds) with the rest of your clinic’s software. These include your patient records, appointment schedules, and billing tools.
PACS (Picture Archiving and Communication System) stores and manages your medical images. When it’s integrated with your Practice Management Software (PMS), Electronic Health Records (EHR), or Radiology Information System (RIS), everything works together. No more switching between systems or entering the same info twice.
This integration makes life easier for your team. A vet tech can check a patient’s chart, pull up old scans, and schedule a new one, all from the same screen. Radiologists and specialists can review images remotely. Your front desk gets cleaner records and faster billing.
With platforms like Medicai, vet clinics can connect their imaging tools directly to patient records, streamlining diagnostics and daily operations without tech headaches.
Cloud vs. Local PACS: What’s the Difference?
When setting up a PACS system, you’ll need to decide: should it run on your clinic’s local servers, or in the cloud? What about the hybrid option?
Let’s see what each offers.
| Feature | Local PACS | Cloud PACS | Hybrid PACS |
| Data Storage | On-site servers inside your clinic | Stored online via vendor-managed servers | Combines on-site and cloud storage |
| Access Speed | Very fast (within the clinic) | Fast with an internet connection | Fast local access + cloud flexibility |
| Remote Access | Limited or none | Fully accessible from anywhere | Full remote access + local availability |
| IT Responsibility | Clinic handles updates, backups, and security | Vendor manages maintenance, updates, and backups | Shared responsibility (vendor + clinic) |
| Infrastructure Costs | High upfront cost for hardware | Lower initial cost, ongoing subscription fees | Moderate cost with dual setup |
| Scalability | Limited by local hardware | Easily scalable as your clinic grows | Scalable and flexible with growth |
| Best For | Clinics with strong in-house IT support | Mobile, multi-location, or small-to-mid clinics | Clinics wanting speed + backup without compromise |
PACS platforms like Medicai offer flexible cloud and hybrid solutions, perfect for clinics that want speed, reliability, and remote collaboration without IT overload.
Why Veterinary Practices Need Custom Imaging Tools
Veterinary medicine isn’t one-size-fits-all, and neither is imaging. That’s why veterinary PACS systems need features tailored to animals, not humans.
Cats, dogs, horses, and exotic pets all come in different shapes and sizes. A generic PACS system designed for human healthcare may overlook crucial details specific to a veterinary clinic. That’s where veterinary-specific customization makes a huge difference.
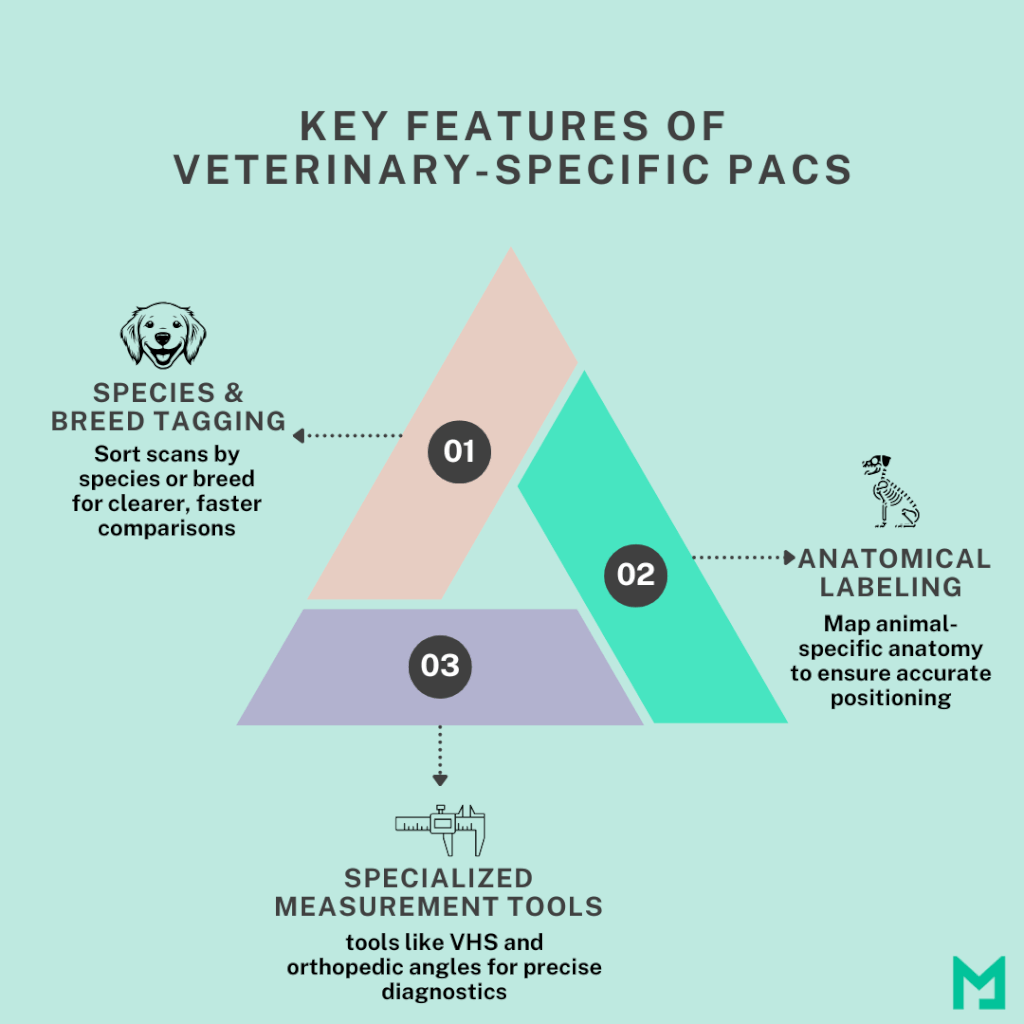
Modern vet PACS platforms are designed to handle:
- Species and breed tagging – So you can sort scans by type of animal and compare breed-specific patterns.
- Anatomical labeling for animals – For accurate positioning of body parts that differ from human anatomy.
- Special measurement tools – Like vertebral heart score (VHS) for small animals or orthopedic angles for equine radiology.
These tools enable vets to capture better images, make quicker diagnoses, and communicate findings more effectively with pet owners and specialists. They also streamline follow-up visits by precisely recalling where and how images were taken.
Modern PACS platforms like Medicai cater to veterinary needs, featuring species-specific labeling and equine imaging support. So you don’t have to use a human-focused system.
Plus, customized vet PACS systems work with all common modalities: digital X-ray, ultrasound, CT, MRI, and even dental imaging. So whether you’re scanning a Chihuahua’s heart or a racehorse’s leg, your system is ready.
Vet PACS Integration Workflow
Integrating your PACS with Practice Management Software (PMS) or EHR links imaging tools, patient records, and billing. Without it, you risk duplicating patient info, losing records, and manually re-attaching scans.
Let’s break down a typical workflow in a veterinary clinic using a fully integrated PACS system.
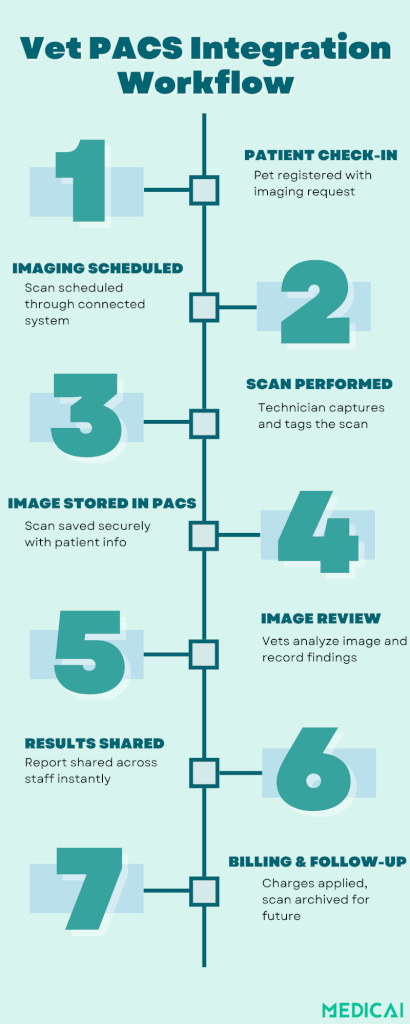
Step 1: Patient Check-In & Order Entry
A patient arrives and is registered in your Practice Management Software (PMS) or Electronic Health Records (EHR). An imaging order (e.g., X-ray, ultrasound) is entered directly into the system—no separate form needed.
Step 2: Imaging Scheduled & Performed
The PACS system receives the order through integration with your scheduling or RIS module. The imaging team performs the scan, and the images are automatically tagged with patient details (thanks to DICOM worklists).
Step 3: Image Storage in PACS
Once the scan is completed, the images are stored in the PACS securely and instantly. The system automatically links them to the patient’s medical record in the EHR/PMS.
Step 4: Image Review & Reporting
Veterinarians or radiologists open the images using the built-in viewer. Tools like Zoom, annotations, and measurements help evaluate the findings. A report is created and added to the patient file, either manually or via voice dictation.
Step 5: Results Shared Across the Team
Through PACS–EHR integration, the report and images are accessible to all relevant staff instantly. No need for email attachments or physical copies.
Specialists and teleconsultants can also access the data remotely, if enabled.
Step 6: Billing & Documentation
The imaging procedure details are automatically synced with the billing system. Accurate CPT codes or item charges are applied. Invoices are generated without extra data entry.
Step 7: Follow-Up & Long-Term Access
Future appointments, follow-ups, or comparisons with previous scans are easy. All images are archived in the PACS and organized by patient, species, body region, and modality.
Clinicians can compare scans side-by-side to track progress or evaluate treatment outcomes.
Benefits of Vet PACS Integration
Integrating PACS into your veterinary practice means transforming how your clinic runs day to day. PACS integration helps you deliver better care, operate more efficiently, and get paid faster.
Faster Diagnostics, Quicker Care
When images flow straight into the patient record and can be viewed instantly by your team or specialists, diagnoses happen faster. No more waiting for files to transfer or manually uploading scans.
Accurate Billing, Better Revenue
Every scan links directly to the patient visit, which means fewer missed charges and cleaner insurance coding. Integration also makes it easier to generate invoices and track payments, helping protect your bottom line.
Remote Access and Teleconsulting
Cloud-based PACS lets you view images from anywhere. Whether you’re working from home or sharing a tricky case with a specialist, access is secure, fast, and HIPAA-compliant. It’s a game-changer for mobile practices and rural clinics.
Streamlined Workflow Means Fewer Errors
When everything is connected, imaging, records, scheduling, and billing, there’s less room for mistakes. No duplicate data entry. No lost files. Just one smooth system from start to finish.
How to Get Started with Vet PACS Integration?
Smooth implementation starts with a smart plan. Whether you’re moving from an outdated system or starting fresh, here’s a step-by-step guide to help you roll things out with minimal stress and maximum success.
Audit Your Current Imaging Setup
Before you change anything, take a close look at your existing workflow:
- How are images captured, stored, and shared
- What software and hardware are in place
- What’s working and what’s slowing you down
This will help you spot gaps and set clear goals for your new system.
Define Your Integration Needs
Next, map out what you want from your PACS integration. Do you need remote access? PMS/EHR sync? Cloud backup?
Make a list of must-haves versus nice-to-haves. It’ll help narrow down your vendor choices later.
Select the Right Vendor
Choose a vendor that understands veterinary workflows and offers integrations with your existing systems. Make sure they:
- Support DICOM standards
- Offer veterinary-specific features
- Have responsive support and clear upgrade paths
Ask for demos. Read reviews. Speak with other clinics if possible.
Pilot Before You Go All In
Start with a soft launch. Implement the system in one department or with a few users. This is your test drive.
Check if everything runs smoothly:
- Are images syncing correctly
- Is data flowing into patient records
- Are staff finding it intuitive
Train Your Team
Even the best tech fails if no one knows how to use it. Schedule team training sessions, create cheat sheets, and appoint PACS “champions” to help others get up to speed.
Create SOPs (Standard Operating Procedures)
Document your new workflow. Having clear step-by-step instructions will reduce mistakes, especially during busy hours or when onboarding new staff.
Gather Feedback & Fine-Tune
Don’t assume everything’s perfect from day one. Talk to your team:
- What’s working well
- What’s confusing
- What would they change
Use this feedback to tweak the system and optimize workflows.
Scale Across the Practice
Once you’ve fine-tuned the pilot, roll out the system across the entire clinic. Monitor performance closely in the early weeks and be ready to troubleshoot.
Challenges & Implementation Considerations
Of course, no system upgrade is without its hurdles. Let’s see what to keep in mind before making the switch.
Upfront Costs & Training Time
While cloud PACS lowers infrastructure costs, you’ll still need to invest in setup, software licenses, or subscriptions. And your team will need time to learn the new system, especially if you’re switching from a manual or disconnected workflow.
Data Migration Can Be Tricky
Moving years of stored images and patient records to a new PACS takes planning. Work with your vendor to ensure a smooth transition and avoid losing valuable data.
Integration Testing Is Key
Not all systems play nicely together. Before going live, test the full connection between your PACS, PMS, and EHR. Make sure files transfer cleanly, patient records sync properly, and no steps get missed.
Watch for Vendor Lock-In
Choose a PACS solution from platforms like Medicai that’s vendor-neutral and supports standard DICOM protocols for vet. This ensures you’re not stuck if you want to switch imaging equipment, cloud providers, or software partners in the future.
Plan for Downtime or Glitches
Have backup workflows and contingency plans in place. Even the best systems can face issues during setup or updates. Being prepared helps keep your clinic running smoothly.
Conclusion
Vet PACS integration is a smarter way to run your clinic. By connecting imaging with patient records, scheduling, and billing, you streamline your entire workflow. From faster diagnostics to fewer errors and better communication, the benefits are real and immediate.
With Medicai’s cloud-ready, veterinary-friendly PACS solutions, you get secure access, seamless integrations, and scalable performance tailored to your needs. With us, future-proof your practice and deliver better care.


Related Articles

Lets get in touch!
Learn more about how Medicai can help you strengthen your practice and improve your patients’ experience. Ready to start your Journey?
Book A Free Demo